Thursday, July 19, 2012

Palak Kadhi (Spinach cooked in yogurt gravy)

Dear all,

I am back with another of my favorite dishes but this time with a healthy twist!


Palak Kadhi

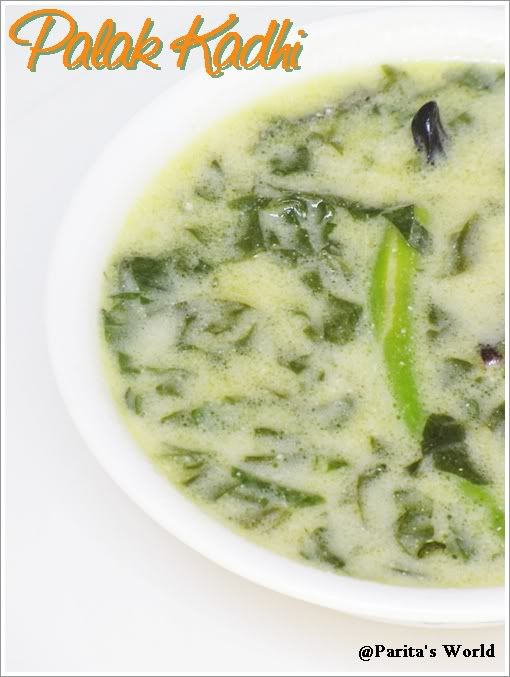
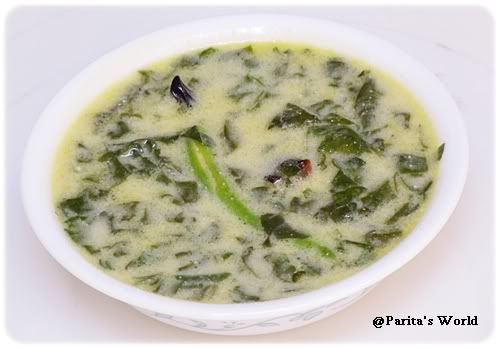
Kadhi has been my favorite since childhood. The satisfaction of having sizzling hot kadhi with khichdi with papad and some spicy pickle is simply out of this world! Its a must to make kadhi atleast once a week in my house. The sour flavor of curd with gramflour and spices really perks up the mood. I love to sip it just as it is like a soup and satisfaction which I get is seriously beyond words. Its my comfort food!

It hardly takes 10 mins to prepare kadhi so whenever I am in hurry this is always on my mind. There are various versions of Gujarati Kadhi but I prepare it in my mom style. For me she is the best cook and no matter what I cannot get the same flavors as her hand. Love you mom!

Palak Kadhi

I am not overly fond of green leafy vegetables and hence always on a look out of new ways to incorporate them in my diet. What better way then add these to my favorite kadhi! I have cooked Palak Dal and really liked it so I was fairly confident kadhi and palak would go well and boy they did! This is a whole meal in itself and I love to have it as a soup! Its healthy and delicious and hardly takes any time to prepare. so lets get started with the recipe

Palak Kadhi
Ingredients:-
1 cup curd (yogurt) preferably sour
2 cups of water
2 cups of spinach leaves cleaned and finely chopped
2 tbsp gram flour (besan)
2 green chilies slit in half
Salt to taste
1 tbsp jaggery
2 tbsp finely chopped fresh coriander leaves


For Tempering:-
2 tbsp ghee or clarified butter
1 tsp jeera (which I forgot to add :( )
a generous pinch of asafoetida (hing)
1 cinnamon stick
2 cloves
1 dry red chili

Procedure:-
  • Beat besan, water and curd together well until there are no lumps, add in salt and beat once again and keep it aside
  • In a pan heat ghee, add in jeera, cinnamon, cloves, red chili and hing.
  • Now add in finely chopped spinach leaves, cover and cook for 4 to 5 mins.
  • Once spinach is cooked, add in curd and besan mixture, green chilies and jaggery
  • Cook in slow gas for 4 to 5 mins until it comes to a boil.
  • Turn off the gas , sprinkle some fresh coriander leaves as garnish and serve hot with khichdi


Palak Kadhi

Hope you all liked the recipe and do give it a try and let me know if you have any questions or doubts.
Until next time take care and stay healthy!


Thursday, June 28, 2012

Spicy Potato Fry / Spicy Aloo Fry

Dear All,

Spicy Potato Fry

Its been a while since I last posted a recipe which was not a cake so today I thought lets share a very simple and satisfying dish. This is my version of Spicy Aloo Fry! Who doesn't love potatoes? I am yet to come across anyone who doesn't like potatoes :) Its one of those vegetable which gives that happy feeling in whichever form you have it say french fries, cutlets, sandwiches, stuffed etc.

Aloo fry is ample around my home, I make it at least once a week. Its one of those dishes which I can have all by itself also spicy, masaledar...and delicious! Slurp! Ok lets get started with the recipe shall we?

Spicy Potato Fry

Spicy Potato Fry
Serves 2
Ingredients:-
5 - 6 big potatoes
2 big onions finely chopped
2 tbsp oil
1 tsp mustard seeds
1 tsp red chili powder
1 tsp turmeric powder
1 tsp jeera powder (cumin seeds powder)
1 pinch hing (asafoetida)
Salt to taste
1/2 tsp garam masala
1 tsp fresh lime juice
1/2 tsp chaat masala
2 to 3 tbsp fresh coriander leaves finely chopped

Procedure:-
  • Wash and chop the potatoes in 1 inch cubes
  • In a heavy bottom pan heat the oil, once its hot enough add in mustard seeds and let it splutter.
  • Now add in hing, chopped onions, chopped potatoes, red chilli powder, turmeric powder, jeera powder and salt.
  • Mix well, cover and cover the potatoes over slow heat for 10 to 15 mins.
  • Make sure to check on them from time to time so that they do not burn. Little bit brown is fine as it gives that rustic look
  • Once the potatoes are almost cooked add in garam masala , chaat masala and lime juice and again cook for another 2 mins.
  • Finally add in chopped coriander leaves.
  • Serve these spicy potatoes with roti or rice.
  • I love to have these all by itself or with hot rice drizzled with ghee :)

Spicy Potato Fry

Verdict:- Its one my most favorite dish of potato and whenever I have it gives me that feel good feeling :) Happy stomach happy me!

Do try the recipe and let me know how it turned out for you :)
Till next time take care and stay healthy!


Friday, June 22, 2012

Celebration Cakes!!!

Hi all,

Sharing couple of celebration cakes which I made this week for Cake Walk :)

The first one is a gorgeous ruffle cake. The cake is pineapple sponge cake with fresh cream icing. I was so happy with this cake, it looked absolutely stunning!


Photobucket


A closer look at the ruffles :)

Photobucket


The second cake was requested by Jalapa who wanted a Eggless Pineapple Kiwi Fresh Cream cake for her husband's birthday and I came up with below version :)

Pineapple Kiwi Fresh Cream Cake, Pineapple Kiwi Fresh Cream Cake

Hope you guys enjoyed the pics as much as enjoyed making these :)


Tuesday, June 12, 2012

Chocolate Truffle Cake for 1st Wedding Anniversary

Hi All,

Samyukta from ISimplyLoveMakeup requested me to prepare a Chocolate Truffle Cake for her first wedding anniversary. I was very excited and nervous at the same time as 1st wedding anniversary is so special and honestly I didn't want to disappoint her.

Also I always believe in giving a personal touch to cakes especially if its a birthday or anniversary. So I asked some of her hubby's favorite things and having met her and following her blog I knew some of her favorite things :) I have incorporated both her and her hubby's favorites in the cake like football, shoes, lipstick, apple logo etc :)

The cake is dark chocolate cake with chocolate ganache used as filling and frosting. The border is done using white chocolate. The cute little items like shoes, lips, football, lipstick, handbag, apple logo etc is all made with chocolates and is completely edible :)

I totally loved the final look and I hope the couple enjoyed it as well.

Here's wishing the lovely couple Samyukta and Saurabh happy 1st wedding anniversary and a wonderful life ahead!!

Enjoy the pics :)
Chocolate Truffle Cake for 1st wedding anniversary

Chocolate Truffle Cake for 1st wedding anniversary

Chocolate Truffle Cake for 1st wedding anniversary

Hope you all liked the cake, do leave your suggestions and comments below.
Thank you


Sunday, May 20, 2012

Eggless Chocolate Truffle Cake

Dear All,

Eggless Chocolate Truffle Cake, Visit paritaskitchen.blogspot.com for recipe!

Hope you all had a great and relaxing weekend. It had been a long time since I made a chocolate cake so thought of making my most favorite cake ever Chocolate Truffle Cake! Doubled the recipe of Eggless Chocolate Cake filled and frosted with homemade chocolate ganache!

The cake turned out to be fantastic! Chocolate ganache filling was simply perfect, not too sweet and not too bitter! I personally love to warm up the cake for few seconds in microwave and have with a BIG scoop of vanilla ice cream!! YUMMMM!!!


Want a slice?
Chocolate Ganache Cake, visit paritaskitchen.blogspot.com for the recipe!


For the recipe, follow my eggless chocolate cake recipe just double all the ingredients to get 8 inch cake

For Chocolate Ganache I followed the recipe from here, the recipe adds flavored liquor but I have not added any.

Once ganache is ready put it in fridge overnight for setting before using it on the cake. Refrigeration will cause ganache to become quite thick and makes it easy for spreading on the cake and piping.

Once filled and frosted the cake with ganache again pop the cake into fridge for atleast couple of hours for setting, remove the cake half an hour before serving.


Chocolate Truffle Cake, visit paritaskitchen.blogspot.com for the recipe!


Hope you guys liked the cake and if in case of any doubts or queries do post below.
Until next time, tc!

Love,


Tuesday, May 15, 2012

Basic Tomato Sauce for Pasta and Pizza

Dear All,

Its been a while since I posted a recipe which is not a cake or a dessert :) So today I will be sharing one of my most favorite recipe of basic homemade tomato sauce! I learnt this recipe from my mom and using it since I don't even remember probably more than 10yrs now! I always use this recipe for my pasta and pizzas and till date it has never failed me!

The recipe is very very simple and very versatile. I always make this sauce and depending upon the dish I am making I tend to add my spices like oregano, pepper etc. For pasta dishes add couple of tbsp of fresh cream and you have the world's most delicious pasta sauce ready! People who have been following me since the start know that couple of years earlier I was based in Switzerland and we used to have pasta and pizzas regularly. This recipe along with addition of fresh cream tastes exactly like that!

I have provided the different versions at the end of the post so do check out!

Basic tomato sauce, For details n recipe check http://paritaskitchen.blogspot.in/

Basic Homemade Tomato Sauce
Recipe:-
Makes 1 cup
1 kg fresh ripe tomatoes
Salt to taste
2 tbsp sugar
1 tsp red chili powder

Procedure:-

  • Wash the tomatoes and chop them into quarters.
  • Put them in a big cooker and add half cup of water.
  • Boil the tomatoes until well cooked for about 4 to 5 whistles
  • Before proceeding cool the tomatoes completely.
  • Blend in the tomatoes using mixie or blender into fine paste, this may be watery so dont worry.
  • Pass the tomato puree through a sieve to make sure all seeds are filtered out.
  • In a non stick pan pour the tomato puree, add in salt and red chili powder and cook until all the water is evaporated and sauce reduces by half and thickens!
  • Be very careful here as the sauce while cooking tends to splutter around!
  • To check the consistency it should coat the spoon nicely without being runny.
  • Finally add in the sugar and cook for another couple of mins.
  • Turn off the gas and use as desired!


Basic tomato sauce, For details n recipe check http://paritaskitchen.blogspot.in/


Variations:-

  • If I am making pasta dish I love to add in few tbsp of fresh cream, I usually use Amul which is easily available at any grocery store, you can even use fresh homemade malai just make sure you blend it well before pouring to avoid lumps of cream in the sauce. Along with cream feel free to add in fresh basil leaves, minced garlic or oregano.
  • For Pizza I use this sauce as it is and drizzle some olive oil and oregano on the pizza while baking.

Feel free to adjust the recipe to your taste, the addition of sugar is very important as it balances out the sourness of tomatoes very well!

Hope you enjoyed the post, until next time, tc!

Love,


Tuesday, May 8, 2012

Devils Food White Out Cake - My Version

Hi All,

I made this cake last week for a colleague in office. Its a chocolate sponge cake sandwiched between fresh cream and chocolate curls topped with chocolate chips and chocolate cake crumbs!

Enjoy the pics and pls leave your valuable comments and suggestions below.

Lots of recipes coming up so stay tuned!

Devils Food White Out Cake

Devils Food White Out Cake


Sunday, May 6, 2012

Pineapple Kiwi Fresh Cream Cake

Dear All,

Pineapple Kiwi Fresh Cream Cake

Firstly a heart felt thank you to all of you for all your best wishes on my Cake Walk post! Last couple of days were quite hectic as had back to back orders for cakes!

Made a Pineapple Kiwi Fresh Cream cake for a birthday and this is one of my favorite combos! Adapted from my Pineapple Fresh Cream Cake recipe.

Sharing couple of pics with you all and hope you like it! Please leave your comments below.


Pineapple Kiwi Fresh Cream Cake

Have few recipes in draft so stay tuned for some mouth watering delicacies coming up shortly!


Wednesday, May 2, 2012

A Dream Come True With CAKE WALK

Hi All,

I have some BIG news to share with you all but before that lets start at the beginning. I have been passionate about baking since as long as I can remember. It all started about 8 to 9 yrs back when we first got internet @ home! Internet opened this entirely new world of creativity for me! Looking at those gorgeous tiered wedding cakes I was dumbstruck! Thereafter I started my real journey with baking!

I started this blog initially to mainly have a dairy of my recipes online but today it has changed my world! I have tried to share my experience with baking through my blog and I love when people come back to me with queries or some doubts or even just to tell me that they tried one of my recipes and it was success! This just makes my day. This is the journey which we have traveled together and I would like to thank you all for your constant support & encouragement!

The news I sharing with you all has been my dream since the time I started baking!
And finally the dream has come true. I present to you all "CAKE WALK" - A sweet little venture of mine!


Even though I used to take orders for cakes on & off whenever I had free time during college or office this is something special! I have started taking orders full time! Yes! I have created a special page for Cake Walk right on the top menu with flavor list and small description of each cake! I'll be updating this page from time to time so do check back!

Also I'll be taking classes on baking very soon! This is request I keep on getting a lot of time and finally I have decided to go ahead with it but currently I am still under process on developing the curriculum for the class etc so it'll take few months but keep in touch for new happenings & dates for the classes!

This does not mean I am done with my blogging! This journey will continue and I'll continue to share my experiences in cooking n baking.

Leaving you with some of my creations during past few years :)

For any orders or queries get in touch with me @8055760713 or email me - paritasworld@gmail.com


Sunday, April 29, 2012

Moist Butter Cake

Hi All,

Moist Butter Cake

I was craving for some home made butter cake from a long time! Even though I bake cream cakes a lot these days for orders pouring in but the aroma of freshly baked butter cake is out of this world! This recipe is definitely a keeper! The cake turned out so moist and buttery! Its not too oily or heavy at all. The added vanilla takes this cake to another level! 

Its a perfect cake to be enjoyed lazy sunday afternoon with some hot coffee and a book! It perfect cake to be served as snacks for kids or even pack it in tiffin for mid day meal.


Moist Butter Cake

I have adapted the recipe from The Little Teochew
Serves 6 to 8
Moist Butter Cake
Ingredients:-
- 195g all-purpose flour
- 1 1/2 tsp baking powder
- 1/2 tsp salt
- 170g unsalted butter, softened
- 1 cup sugar, 200 gms
- 2 medium eggs
- 2 tsp vanilla essence
- 12 tbsp whole milk


Procedure:-
- Preheat the oven to 175 degress C
- Sieve flour, salt and baking powder.
- Beat sugar and butter together until light and fluffy, about 3 to 4 mins
- Beat in one egg at a time in the sugar and butter mixture until well mixed
- Add in vanilla and mix well
- On low speed add the flour alternating between milk in the egg mixture. Make sure no lumps are there.
- Pour the mixture into greased and floured cake pan.
- Bake for about 40 to 45 mins until a tooth pick inserted comes out clean.
- Cool completely before cutting the cake or else you'll end up with lots of crumbs.
- Always use a serrated knife to cut the cake.
- Serve with coffee or tea as snack or add a dollop of cream fresh and some fruits to serve it as dessert!
- All in all a perfect butter cake!

Moist Butter Cake

Just look at those fine cake crumb! Isn't it gorgeous? You can omit vanilla and add in any flavor you like - lemon, butterscotch, orange, cardamon etc or throw in some chocolate chips!. It's very versatile recipe so do try it out and let me know how it turned out!

Until next time take care!

Love,


Wednesday, April 25, 2012

Molten Chocolate Lava Cake

Dear all,

Chocolate Lava Cake

This cake was on my to do list since a long time! Who doesn't like gooey chocolaty chocolate cake which is easy to prepare and is ready in less than 30 mins!! I think the first time I tasted this cake was from Dominos and to be honest never liked it a bit! It leaves weird oily taste behind..yuk!!! I have seen this cake floating around a lot in blogosphere and finally made it this weekend! It's a fool proof recipe though I would like to reduce the sugar a bit as don't really have a sweet tooth but of course you can use the same quantity of ingredients :)


Chocolate Lava Cake - Ingredients

I have adapted this recipe from ShowMeTheCurry.com. I really like those two gujju gals blame me for being biased :P and also most of the recipes tried from their blog has always given me great results! Both Hetal and Tanuja are quite sweet and explain the recipes really well.

Chocolate Lava Cake - Recipe
Recipe adapted from ShowMeTheCurry.com
Molten Chocolate Lava Cake
Ingredients:-
Bittersweet chocolate - 113gms
Butter - 113 gms (I used amul)
2 eggs
1/4 cup all purpose flour - 35 gms
1/3 cup sugar - 70 gms

Procedure:-

  • Grease 6 ramekins with butter and keep them aside.
  • On a double boiler or microwave melt the chocolate.
  • Once completely melted remove from heat and add in the butter and mix well until butter is completely melted.
  • In a separate clean bowl beat together sugar and eggs until light and fluffy for about 3 to 4 mins.
  • Add the chocolate mixture to the egg mixture and mix well.
  • Now gently fold in the flour until its well incorporated.
  • Preheat the oven at 180 degrees C, fill in 6 ramekins till 2/3 or max 3/4 cup and bake these for exactly 10 to 13 mins! If you bake any longer the gooey center might become hard. Adjust the time according to your preference shorter for gooey and longer for hard center.
  • Immediately serve these with fresh cream or sprinkled some strawberries and icing sugar!
  • Best serve them with vanilla ice cream!

Chocolate Lava Cake

This is gonna be permanent in my house and will be making every week I suppose! Nothing wrong to pamper yourself every once in a while :)

Hope you guys enjoyed the post, incase of any questions or doubts pls post in comments section and I'll get back to you asap!

Thank you and until next time, tc!

Love,