Tuesday, June 30, 2009

Rava Laddoos for Indian Cooking Challenge

Srivalli of Cooking4AllSeasons announced Indian Cooking Challenge where every month tried and tasted indian traditional recipe would be chosen and all the participants need to make the dish and post it on the same day, isnt it fun? I am very much excited about this monthly challenge, it would be my first ever food challenge and i am looking forward to learn many new dishes! This months theme is Rava Ladoo. Rava Ladoo is one of the most loved indian sweet, very easy to prepare and is loved by all age groups. We usually prepare Sheera with Rava/Semolina which has consistency of more like a pudding or halwa. I have followed Srivalli's recipe which you can see here. The only change i made was to add little kesar or saffron, whats an indian sweet without kesar? Even little bit of kesar gives wonderful aroma and taste which makes you crave more! The recipe yielded 10 laddoos of medium size. Sugar was little more for my taste, next time i'll only use little more than half. Thanks Srivalli for this wonderful challenge!
Ingredients: 1 cup Rava/Semolina/Cream of Wheat 1 cup sugar 25 ml ghee 25 ml milk 1/2 tsp cardamon powder 10 cashews 10 golden raisins 25 gm fresh grated coconut or desicated coconut few saffron strands (optional) Procedure:
  • Heat 2 tsp of ghee in a pan, when its hot fry the raisins and cashews. Once the raisins balloon up remove and keep them aside. Now roast the coconut in the same pan, when done remove and keep aside.
  • Add the remaining ghee and roast Rava till its well roasted and aroma starts coming out.
  • In a bowl, take all the roasted rava, nuts, coconut and add the cardamom powder. Then add the sugar. Mix well.
  • Soak the saffron strands in the warm milk for about 5 mins.
  • Then slowly add the warm milk into the bowl of rava mixture. Check if you are able to make balls. When you find that milk added is enough to get you round ladoos, transfer it back to the pan and cook in sim for 2 mins. Mix well and then cover it and let it rest for 2 mins. Then immediately make balls or laddoos.

Sunday, June 28, 2009

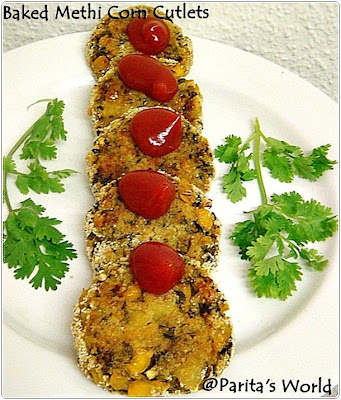
Baked Methi Corn Cutlets

Baked Corn Methi Tikki Staying away from family has its own advantages, when I visit home I am pampered like anything, my mom makes may favorite dishes, I can watch disney channel without interruption(which my brother hates!) and sleep till mid day. On my last visit home, i went to see my aunt and by mistake i mentioned we dont get fresh methi leaves in swiss and immediately she packed a big box of dried methi leaves for me to take back. My aunt sun dries the fresh methi (fenugreek) leaves and stores them. Dried methi leaves stay good for months and you just need to soak them in water for 10 mins before using and they are ready to be used. I am sure everyone knows the health benefits of methi so i wont repeat the same and bore you guys. I always try to find new ways to incorporate methi in my diet. On of my favorite is methi theplas which is very much gujju's trademark. Another dish I am fond of is Aloo Methi which i'll be posting soon.
I made these cutlets in my effort to use up the sweet corn kennels which i had in my fridge. Initially i thought of making cheese sweet corn balls which i posted here but then the idea of all that unwanted calories made me feel guilty! Cutlets were second in my list and by adding methi they were super healthy and delicious and not to forget guilt free as they were baked!!
These Baked Methi Corn Cutlets are off to Madhuram's Low Fat Eggless Baking event and to CFK:Leafy Vegetables guest hosted by Pavani, mastermind of Sharmi. The first pic is off to Click:Stacks event by Jugalbandi.
Baked Corn Methi Cutlets Ingredients: 1 cup boiled mashed potatoes 1/2 cup fresh/dried fenugreek(methi) leaves finely chopped 2 tbsp fine bread crumbs 1/2 cup sweet corn roughly grinded 2 green chillies finely chopped 1 tsp fresh lime juice 1 tsp sugar 1 tsp chaat masala Salt to taste 2 tbsp finely chopped coriander Bread crumbs to roll the cutlets in
Baked Corn Methi Pattice Procedure:
  • Preheat the oven to 200 degrees C.
  • Mix all the above ingredients together nicely. Make sure you dont make it extremely mushy.
  • Make small round balls and press them in middle to make flat round cutlets.
  • Roll these cutlets in bread crumbs.
  • Line the baking tray with foil paper.
  • Grease the foil paper using little oil.
  • Bake the cutlets for 15 mins on one side, flip and bake for another 15 mins until light brown on both the sides.
  • Serve hot with sauce or coriander chutney. You can also use these cutlets in between the burger buns.

Thursday, June 25, 2009

Strawberry Sorbet

Last weekend I visited a Strawberry farm where I picked some really fresh and BIG strawberries. It was such a great experience, the owner of the farm allows you to eat as many strawberries as you want and you can also buy fresh strawberries picked by yourself on a very reasonable rate. I got so excited i bought almost 2 kilos of them. I am planning to visit the farm again for some more strawberries and fresh raspberries :) Sorbet are one of my favorites and perfect for summers. With so many strawberries how could i not make one? Its the most simple and delicious desserts of all and not to forget so very refreshing!! I prefer to make sorbets using fresh and juicy fruits, berries go well, even pineapple, mangoes and peaches go extremely well. Personally we loved the strawberry sorbet, it tasted yummy and i just loved the color! Looking at it only made me feel all happy and cheerful.
Strawberry sorbet is making its way to Strawberry Feast hosted by Happy Cook and to Ben's Home Made # 5 Ice Creams.
Ingredients: 1 kg fresh strawberris chopped 3/4 cup sugar 1 tbsp fresh lime juice 1/2 cup water (optional only if required) Yeah thats it just 3 ingredients to get this fresh and refreshing sorbet!!! Look at the color, isnt it gorgeous?
Procedure:
  • Mix the sugar and strawberries and keep aside for minimum 4 to 5 hours, until the berries have released water and become mushy.
  • Blend together the strawberry and sugar until smooth. Add in little water if required. I did not add in any water as the juices released from strawberries were enough.
  • Pass this through a sieve to remove the seeds and to get a smooth sorbet. If you like crunchy you can skip this step.
  • Now add in the lime juice and mix well.
  • Freez the sorbet in a broad flat vessel or you can even make lollies out of this.
  • Remove from the freezer and refrigerate for 15 to 20 mins before serving, this will help the sorbet to become soft and you can easily scoop the sorbet.
  • Scoop sorbet in glasses and serve chilled. You can drizzle little chocolate sauce if you like or garnish with colorful sprinkles.

Tuesday, June 23, 2009

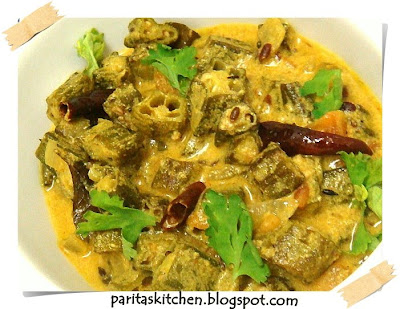
Dahi Bhindi (Lady Finger in Creamy Yogurt Gravy)

Dahi BhindiI dont remember when i fell in love with okra but I am glad i did. Okra/Bhindi/Lady Finger is one of the few vegetable which is loved by everyone, i have not seen a single person who doesnt like okra. Personally i love okra stir fried with onions, serve them hot with rotis drizzled with ghee and its perfect and satifying meal. Just thinking of it makes me drool!! Today I am going to share a recipe of okra in creamy yogurt gravy. This is one of my favorite curries and if you love okra then you got to try this. I had first tasted this dish few years back at a friends house and fell for it. Over the years i have prepared this many times and always makes me want more! The taste is very much similar to Kadhi which i have posted earlier with addition of crispy okra pieces. The challenge here is to make sure you donot curdle the curd. Serve hot with little ghee drizzled and its perfect for rice or roti. The recipe below serves 4. Ingredients: 1/2 kg Okra washed,dried and chopped in 1 inch pieces 2 onions chopped finely 1 cup curd beaten 1 tbsp fresh cream (optional) 1 tsp sugar or jaggery powder 1 tsp ginger paste 1 tsp amchur powder 1 tsp red chilli powder 1/2 tsp turmeric powder 1/2 tsp coriander powder 1/2 tsp cumin powder 1 tsp garam masala or kitchen king masala Salt to taste Ghee and Coriander leaves for garnishing For Tempering: 2 tsp oil 1 tsp urad dal 2 dry red chillies broken 1 tsp cumin seeds 5-6 curry leaves a pinch of Asafoetida/hing 1 bay leaf
Dahi Bhindi RecipeProcedure:
  • In a pan heat 1 tsp oil and add the chopped okras, cover them on medium heat until light browned and crispy on the edges. Turn off the heat and keep aside.
  • In another pan heat 2 tsp oil for tempering, add mustard seeds, urad dal, red chillies, hing, curry leaves and bay leaf. As soon as the urad dal starts getting light brown in color add in the chopped onions and fry them until translucent.
  • Add in the cooked okra pieces along with the rest of the masalas. Add few tbsp of water and cook for few mins.
  • Lower the heat and add in the well beaten curd and fresh cream and mix well. Again you can add few tbsp of water to achieve the required consistency.
  • Cover and cook for 5 minutes.
  • Garnish with fresh coriander leaves and drizzle some ghee, serve hot with rice or roti.

Thursday, June 18, 2009

Chana Masala (Chickpea Curry) for T&T

Chana Masala Recipe
Chickpeas are one of my favorite. Fully loaded with proteins chickpeas are very versatile too. You can create lots of dishes right from snacks, rice, curries, soups, dips and even salads. So when i saw this delicious Chana Masala on HookedOnHeat which is the blog featuring on Tried and Tasted event for this month i couldnt resist my self and recreated this dish. I must say Meena has wonderful collection of indian dishes, few of them which i had forgotten and reminded me of old memories. There are so many dishes which i have bookmarked and cant wait to try. I just heard that Meena is writing a cookbook which will be out in 2010. I wish Meena all the very best for the book! Now for the recipe, I have simply followed meena's version as i very much prepare it in the similar way, the only change i made was to puree tomatoes and onions together and i also doubled the recipe. Sending this to Tried & Tasted : Hooked On Heat event guest hosted by Kits Chow, originally started by Zlamushka. Also sending this to My Legume Love Affair MLLA:12 guest hosted at Annarasa this month, mastermind of Susan.
Pooja and Nithya both have passed "One Lovely Blog Award" to me, thank you so much gals, I love your blog too :) Passing this award to just 10 pals is difficult and not fair as i love all my pals blogs...so I am passing this award to all of them who are following me, check out my side bar for the same, please do accept the award gals and spread the love!!
Chole Recipe Ingredients: 2 cups chickpeas soaked overnight and cooked 2 large onions quatered 2 large tomatoes quatered 2 green chillies 1 tsp ginger paste 1 tsp cumin seeds 1 tsp red chilli powder 1 tsp coriander powder 1 tsp turmeric powder 1 tsp cumin powder 1 tsp chana masala powder 1/2 tsp garam masala Salt to taste 1 tbsp oil Onion rings and coriander leaves to garnish
Homemade Chana Masala Procedure:
  • Puree the tomatoes, onions and green chillies together in a blender until smooth.
  • Heat oil, add in cumin seeds, as soon as the seeds start to splutter add in ginger paste and cook for few seconds.
  • Add in the tomato and onion paste and all the masalas and little water, cover and cook for 7 to 8 mins until raw smell of onions disappears.
  • Now add in the cooked chickpeas, cover and again cook the curry for 5 to 8 mins until thick enough.
  • Garnish with sliced onions and coriander leaves, serve hot with bhatura or puris.

Wednesday, June 17, 2009

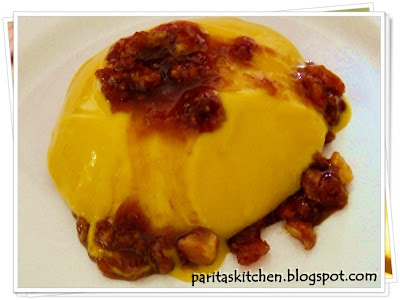
Mango Pannacotta with Caramelized Mangoes and Hazelnuts

Mango Panna CottaFinally last week I got some real good mangoes here, got 2 boxes of them out of which only four mangoes are now remaining :) Last week we had a farewell dinner for one of our friend who was returning back to india. I prepared this mango pannacotta for dessert and it was a huge hit, everyone just loved it. One of my friend who doesnt like sweets actually asked for a second time, which itself was a big compliment :) i have adapted the recipe from here tweaked a bit and it came out perfect. I was not a big fan of caramel but now I have become one, caramel topping goes extremely well with mild sweet taste of panna cottas. The recipe is simple to make and no way anyone can go wrong with it, i have already made it twice since last week and everytime it doesnt last a day!! I have chosen hazenuts to go with mangoes for the caramel topping, you can select any nut of your choice.

Sending this to SHF June 2009 hosted by Mansi where the theme for this month is "Fruit & Nut". Also sending this to Srivalli's Mango Mela.
I am also sending this dish to Mansi's Sweet Celebration event
Ingredients: 2 big mangoes or 3 medium mangoes chopped 1 cup fresh cream (250 ml) 2-3 tbsp sugar depending upon sweetness of mangoes 3 gelatine sheets 1/2 cup water For Caramel topping: 1 big mango chopped 2-3 tbsp chopped hazelnuts 1/2 cup brown sugar 1 tbsp water
Mango Pannacotta with caramelized hazelnutsProcedure:
  • Puree the mango pieces in blender until smooth paste.
  • Soak gelatine sheets in 1/2 cup water for 5 mins, until soft.
  • Heat the fresh cream and sugar, turn off the gas as soon as the cream reaches a boil.
  • Add in the gelatine sheets and mix well.
  • Now add in the pureed mangoes and whisk until well blended. Adjust sugar if required, as I have topped the panna cottas with caramel topping I didnt make them too sweet.
  • Pour in serving glasses, cover with a foil and chill in fridge for atleast 4 to5 hours, I chilled them overnight.
Procedure for Caramel topping:
  • For caramel topping, heat the sugar in heavy bottom pan preferrably non stick. After few mins stir using a wooden spoon, it will quickly turn into caramel sauce.
  • When all the sugar is melted, remove from heat, add in chopped mangoes and hazelnuts and stir well, at this stage it will tend to harden up but dont worry it will eventually come to runny state. If required you can add in little water.
To serve, dip the serving bowl in warm water for a min, invert it onto the serving plate. Enjoy this luscious dessert chilled with caramelised mango and hazelnut sauce.

Monday, June 15, 2009

Homemade Veggie Pizza From Scratch!!!

Making pizza at home from scratch was on my to-do list from a very long time, ever since i saw on Deeba's blog. Finally i made pizza at home and i must say they were pretty damn good!!! I must admit I am not a big fan of pizzas, probably I am the only person who does not like pizzas :( I do like whole wheat pizza that too without cheese!! . Most of my friends here like either cheese pizza or Margherita, whereas i like mine with lots of veggies and spices as you can see in the clicks. The recipe for the pizza base i have adapted from Deeba's blog, the original recipe you can find here. The crust is made using whole wheat and all purpose flour and for topping i have used baby corns, onions, spring onions, bell peppers, jalapenos and cheese. You can use whatever veggie you have in hand. Sending this to Bread Baking Day, BBD # 21 hosted by Zorro where this month's theme is Pizza!! Also sending this to Priya's AFAM:Bell Peppers event started by Maheshwari.
Ingredients for Pizza Base: 3 cups all purpose flour 2 cups whole wheat flour 2 tbsp fresh yeast 1 tbsp salt 1 tbsp sugar 2 cup warm water 2 tbsp olive oil For Pizza sauce: 4 medium tomato pureed 1 onion finely chopped 1 tbsp fresh cream 1 tsp olive oil 1 - 2 tsp sugar(i used brown sugar) 1 tsp dry basil leaves Salt and pepper to taste For topping: Topping can be any veggie of your choice, I used bell peppers, baby corns, onions, spring onions, jalapenos, sweet corns etc Procedure:
  • Add the yeast, salt and sugar in warm water and keep aside for 10 to 15 mins until frothy.
  • Mix both the flours, add in oil and warm water and knead into a soft dough.
  • Flour a smooth surface and knead the dough for about 8 to 10 mins, until smooth and shiny.
  • Transfer the dough into greased bowl, cover the top of the dough with oil and let it rest at a cool, dry place for about 2 hours.
  • I covered mine with a foil and let it rest for 2.5 hours.
  • The dough will rise almost double, punch the dough to remove the air. Divide the dough in 3 balls.
  • For Pizza sauce, heat olive oil in a sauce pan, add finely chopped onions, sauce them until light brown, now add pureed tomatoes, salt, pepper and sugar. Cook for around 10 to 15 or until desired thickness achieved. Now add in fresh cream and basil leaves and simmer for 2 mins.
  • Roll out the dough on a lightly floured surface. Top the dough with pizza sauce and veggies. Sprinkle cheese on top og the veggies.
  • Bake the pizza at 225 C degrees for 30 to 35 mins, or until done.

Friday, June 12, 2009

Pasta in Tomato and Leek Sauce

I had first tasted Leeks in my office cafeteria and i absolutely fell in love with it. Leeks belong to the same vegetable family as onions and garlic, called Allium. Since Leek belong to thw same vegetable family as onions and garlic, they do share many health beneficial compounds. Research has shown that consuming allium vegetable reduces the risk of prostate and colon cancer, it also helps in stabalizing the bloog sugar level. Find more information on leeks, here. Leeks with a more delicate and sweeter flavor than onions adds subtle touch to the dish without empowering the other flavors present in it. The recipe I am sharing today is very simple one but tastes great. Ideal for weeknights meal and is ready in half an hour. The recipe below serves two. Sending this to Presto Pasta Nights, PPN#118 this week hosted by Daphne. Remember my question, here? A big THANK YOU to all who gave their suggestions and views. I chose Blogher because of their flexibility in contract and i really like the way they frame their ads, I am not sure about the revenue as I have just started :) Ammu has passed "One Lovely Blog Award" to me, thank you very much dear, you are very generous :) Ingredients: For Pasta: 1 cup pasta, any variety 1/2 tsp oil Salt to taste Water to cook For Tomato Sauce: 1 medium onion chopped finely 2 tbsp tomato puree 3 medium tomatoes quatered 1 medium tomatoe finely chopped 2 tbsp fresh crean 1 tsp dry basil leaves 1 tsp butter Salt & Pepper to taste For Leek Sauce: 1 big leek 1 tsp butter 1 tsp cornflour 2 tbsp milk 2 tbsp fresh cream Salt and pepper to taste
Procedure:
  • Cook the pasta in about 3 to 4 cups water, add oil and salt, cook till tender.
  • For tomato sauce, grind together 3 quatered tomatoes with very little water in smooth paste. Pass through a sieve to remove the seeds.
  • In a pan, heat butter, now add in chopped tomatoes and onions, sauce for about 2 to 3 mins, until onions become soft.
  • Now add in tomato puree and tomato paste which we prepared earlier, mix well and cook for another 3 mins.
  • Add dry basil leaves, salt, pepper and fresh cream and cook for another 2 mins.
  • For Leek sauce, clean the leek well. Use only the white and light green parts of the leek and chop them finely.
  • In a heave saucepan, add butter and finely cut leek pieces and sauce until light golden brown.
  • Mix cornflour into milk and make a smooth paste.
  • Add fresh cream and cornflour mixture into leek and mix well. The mixture will thicken very soon.
  • Season it with salt and pepper.
  • To serve, mix tomato sauce and pasta well together, add little leek sauce on top, garnish with few coriander leaves and serve hot.

Tuesday, June 9, 2009

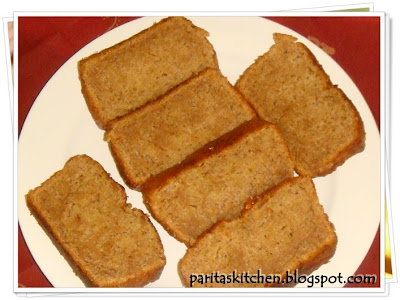
I Won!!!!! celebrating with Fatfree Eggless Banana Cake

Fatfree Eggless Banana CakeI Won!!!! yes I Won!!! yippeeeee, i still cannot believe this, i won the BSI:Bell Peppers event hosted this week by Jenn of Bread+Butter, you can check out all the entries here. You can check out my entry Cheesy Bell Pepper Swirls here. I was so happy that i cudnt control my happiness, i was chirping like a bird nonstop, my friends started thinking i have lost is completely :) this was not enough, i was just informed by Jenn that winner will be receiving a prize too, now this is a pleasant surpise, i have never won any prizes not atleast for my cooking....you can check out the prize here. I would really like to thank Jenn, this is the first BSI i have participated and winning the first time is really very special. THANK YOU once again!!!!
Ok enough of my blabbering, now for todays post I had few bananas in my pantry.....taking their last breath.... :( I must confess I am not too fond of bananas, my mom used to make me eat these with milk for the calcium content, i would rather prefer to eat calcium tablets...grrrrr..its difficult when you know something is good for your health but still you dont want to accept it, does this sounds familiar? do you all have experienced the same? pls do share.....atleast its good to know m not alone :)
Now the most important part, how to use these over ripen bananas, eating them was out of question, i have never made a banana cake before so I made an eggless version as bananas are often used as egg substitutes and this would be great way to make some healthy breakfast. I made this absolutely fatfree..i know its sounds stupid...a cake without butter or oil... thats not possible.....but believe me it is and you would really be surprised how moist this cake turned out to be. A slice served with a glass of cold milk serves as very healthy and fulfilling breakfast. If serving after dinner, just warm the cake in micro for few seconds and serve with a dollop of vanilla ice cream, drizzled with chocolcate sauce...wow now thats a real treat :) This recipe is completely created by me, its not adapted from any of the recipes so its an original one from me. Next time i'll add in few nuts and chocolate chips as well
Pooja has passed me "One Lovely Blog Award" thank you so much dear, m very touched, thank you for thinking of me :) Sending this dish to Original Recipe Culinarty Event. Also sending this to Madhu's Low Fat Eggless Baking event, EFM:Breakfast Series by SriLekha and finally also sending the click to Show Me Your Breakfast event by Divya....Happy hosting gals For the decision regarding the advertising, i still am researching and will let you all know soon, i guess you will automatically come to know :) Low Fat Eggless Banana Cake Ingredients: 2 over ripen big bananas pureed 2 cups all purpose flour 2 tsp baking powder 1/2 tsp baking soda 3/4 cup brown sugar 3/4 cup sour milk(See note below) 1 tsp vanilla essence Fatfree Eggless Banana Cake RecipeNote: We get sour milk here in the stores but to make sour milk at home, just add a 1tsp of fresh lime juice to warm milk and let it stand for few mins to thicken. I think you can substitute it with yogurt too though i have not tried this yet also sometimes buttermilk is also called as sour milk, see here. Procedure:
  • Preheat the oven to 180 degrees C
  • Grease and line a rectangular baking tin or a bread tin.
  • Beat together pureed bananas, sour milk,sugar and vanilla essence for about 2 mins until nicely blended.
  • Now add in the dry ingredients in 3 turns and beat on lower speed for about a min.
  • Now you can add in nuts/chocolate chips etc, mix well.
  • Transfer the batter to baking pan and bake for 35 to 40 mins, until a toothpick inserted comes out clean.
  • Remove and cool it for 15 to 20 mins, cut into slices and serve with a glass of cold milk.

Saturday, June 6, 2009

Jain Vegetable Makhanwala, an award and a QUESTION

Being Gujarati I am very much familiar with Jain cuisine, though m not jain but i do have lots of friends who are, infact majority of my gujarati friends are jain. Jain cuisine is purely vegetarian without potatoes, onions and garlic. My food is incomplete without onions, i use them in almost every dish especially gravy based curries so making jain gravy based curry is always a challenge but not impossible. For today's post I have made simple and creamy Jain Vegetable Makhanwala. The curry is delicious and i didnt even feel that something was amiss, it was perfect. Do try this out and experience for yourself.
Ann from Happy and Healthy Cooking as passed "One Lovely Blog Award", my dear I am so touched and honored, thank you so much for thinking of me. I am passing this award to all my blogger pals, please accept and keep spreading love!!!
Now for the question...I have been trying to decide on which to take Blogher or Foodbuzz advertising from a long time now..still havnt figured out..I have seen majority of you have Foodbuzz advertisements featuring on your blogs and some of you also have Blogher. I would request you all to share your experiences with each, if you have tried both, which one do you prefer and why, this will really be helpful for new comers. Please leave your comments or you can also email me. Sending this dish to RCI:Jain Cuisine, guest hosted by PJ of Seduce Your Tastebuds, an event started by Lakshmi of VeggieCuisine.
Ingredients: 1 cup boiled vegetables (cauliflower, peas, capsisum, french beans) 3 medium tomatoes quatered 2 green chillies 1 tsp ginger paste 10-12 cashewnuts 1 tbsp poppy seads (khus khus) 1 tbsp oil 1 tsp cumin seeds 2 bay leaf 2 dry red chillies broken 3 cloves 3-4 cardamon crushed 3-4 whole pepper 1 pinch of Asafoetida 2 tbsp fresh cream 1 tsp turmeric powder 1/2 tsp garam masala 1/2 tsp pav bhaji masala 1 tsp sugar Salt to taste Procedure:
  • Grind together tomatoes, cashewnuts, poppy seeds, green chillies and ginger paste into a fine paste preferrably without water.
  • Heat oil, add in cumin seeds, cloves, dry red chillies, bay leaf, cardamons, asafoetida and whole peppers.
  • As seeds start to splutter, add in the tomato paste and cook for 2 mins.
  • Now add in turmeric, garam masala, pav bhaji masala, salt, sugar and fresh cream.
  • Cook for 5 to 6 mins on medium heat, add little water if required.
  • Now add in the boiled veggies and cover and cook for another 2 mins.
  • Serve hot with rotis or parathas.

Friday, June 5, 2009

Cheesy Bell Pepper Swirls..little drops from heaven

I was planning to make these from a very long time but never got around to it. Finally I made them yesterday night and they came out like small drops from heaven, the crust was flaky and crunchy with cheesy bell peppers spiced with jalepenos,basil and chilli sauce....oh my just writing the post made me hungry. I had first seen these here, but the filling used was spinach and cheese, though the reviews were great, i was skeptical of the combination, me not a big fan of spinach or cheese, plus i dont like using frozen spinach, and i didnt have any fresh ones in hand. On the other hand i had lots of bell peppers, i always have them, thats the only veggie which is always available in my fridge. I created my own stuffing and it turned out to be perfect.
For the crust i had bought these small pastry puff sheets thought it would be easier with them, no kneading, rolling or cutting required but fate had something else planned for me!!!!! After coming back from office, i removed the pastry puffs from freezer to get them to room temperature and i started working on my stuffing. Stuffing really didnt take much time, was ready in 10 mins. It was written on the pastry puff packed to keep them at room temperature for about 40 mins so still 30 mins to go. Oh well i felt like taking a short nap but again fate ditched and sent some visitors uffff... These days i get lots of visitors coming in to view my apartment as i will be vacating the same in few months. A couple came yesterday from france and the worst part both didnt know english, only the wife could speak tits and bits of english words, I myself being expert in french with knowing only words like Merci, Bonjour didnt make the task easier :( The only words common between us was "OK", it was so tedious to try to make them understand using sign language, in normal circumstances it wouldnt take not more than 15 mins but with them it took me almost an hour to show around the house and explain the details. Between completely forgot about the pastry puff sheets!!!! i thought the sheets would probably be seperated with a parchment paper but to my horror they all were stick together so much for the easier way!!!! Ah but do i look like i'll give up on some stupid pastry puff sheets? nah...so here's what i did, i rolled the entire thing into one big dough, divided into 4 equal balls , rolled and cut them into rectangles and this way made my own pastry puff sheets!!! of course not entirely from scratch but did save a disaster from happening :) If you are a cheese and bell pepper fan..you ve got to try this even if you are not may be you'll become one after trying this :) its so simple and easy to make and yet tastes heavenly..i can go on and on for these :) I liked them so much that i'll probably keep them as one of the starter items in my wedding/engagement party.....ah naaa dont get any signals here...m still single and not ready to mingle, but doesnt hurt to plan right? Ah i think i have bored you guys a lot today, oh before i forget sending these to AFAM-Bell Peppers guest hosted by my dear friend Priya, mastermind of Maheshwari. Also sending these to BSI:Bell Peppers hosted this week by Jenn of Bread + Butter
Ingredients: 4 pastry puff sheets thawed* 1 big red bell pepper chopped finely 1 big yellow bell pepper chopped finely 2 spring onions with their greens chopped finely 2 medium jalepenos chopped (I like spicy) 1/2 cup grated cheese 1 tsp olive oil 1 tsp red chillie paste 1/2 tsp black pepper powder (optional) 1/2 tsp dry basil powder 1/2 tsp sugar (optional) Salt to taste Procedure:
  • Preheat the oven at 200 degrees C.
  • In a sauce pan, heat olive oil, add in bell peppers, jalepenos, basil, spring onions, salt, pepper, sugar,red chilli paste and saute for 5 mins. You dont want to cook them mushy.
  • Take a pastry puff sheet onto lightly floured surface, spread the bell pepper stuffing leaving little space on the sides. Top it with grated cheese and fold the sheet carefully into a tight roll sticking the sides together with little water if required.
  • Cut 1/2 inch slices of the roll. Similarly stuff and roll the other 3 pastry sheets as well and cut them into slices.
  • I have used my pizza dish to bake the swirls, you can use the normal baking dish.
  • Line the baking dish with a parchment paper or foil and bake them for 20 to 30 mins or until light brown.
*Please Note: Number of pastry sheets may vary depending upon the size of the pastry sheets. Baking time may also vary , in the original recipe its mentioned to bake for 15 mins, but mine took more than 30 mins.

Thursday, June 4, 2009

Saffron Rice - A Classic


The moment Nags announced the Monthly Mingle theme as "Ravishing Rice" the only dish came to my mind was "Saffron Rice". I have made this many times and it has always been a hit in my house, never had any left overs with this dish. In indian restaurants this dish is the most expensive one with the use of saffron and dry fruits in it. I have always liked the home made versions better than the restaurant ones, ofcourse there are always few exceptions. This dish is very easy to prepare and results are outstanding. Recently I had been to london on a short trip and i got many small boxes of saffron from there. You get very good quality saffron in UK at very reasonable price and I always ask my friends and relatives to get some for me when they are visiting. Saffron should be stored in cool and dry place and it stays fresh for years. I love this herb, i use it in desserts, veggies and even in my face packs :) Saffron may seem to be very expensive but one little dab of this delectable herb is needed to make something classy and spectacular. I simply adore the aroma and flavor saffron brings out in the food making it so exotic and delicious. Sending this to Monthly Mingle : Ravishing Rice guest hosted for this month by Nags of Edible Garden, master mind of Meeta. Hema from Salt to Taste as passed "I Love Your Blog" award to me, thank you so much girl, it means a lot to me.
Ingredients: 1 cup basmati rice 1/2 cup milk 1/2 tsp saffron strands 8-10 cashews cut into half 10-15 raisins 1 onion sliced thinly 1/2 cup chopped carrots and green peas 5-6 cardamon pods (elaichi) broken 2 small cinnamon sticks 2 green chillies slit 4-5 whole peppercorns 2 small bay leaf 1 tbsp ghee Salt to taste 1 1/2 cups of water Procedure:
  • Wash and soak the basmati rice in cold water for about half an hour.
  • Warm the 1/2 cup of milk and add the saffron strands and let it sit for 5 mins.
  • In a big vessel, preferrably non stick heat ghee, add in cardamon, bay leaf, pepper corns, slit green chillies, cinnamon sticks, cashews and raisins.
  • Saute the dry fruits for about a min, now add in sliced onions and saute for another 2 mins.
  • Now add in soaked rice, carrots and peas and saute for another 2 mins. Rice grains should be nicely covered with ghee.
  • Mix together saffron milk and 1 1/2 cups of water and add in the rice.
  • Season the rice with salt to your taste and cook on medium slow heat for about 15-20 mins.
  • Make sure you donot add more water as we dont want to make rice mushy.
  • Garnish with few saffron strands and fresh coriander.
  • Serve hot with raita and pickle.